This document describes how to mount an NFS drive exported from a Linux file server on a Mac OS X client using the automount daemon.
Note: Currently OS X 10.2-10.4 is covered. 10.5 is slightly different because some of the utility programs have been removed. I am working on updating this guide to reflect that. Also see the links at the end of this page.
Background: I got a Mac Mini, played a bit with it and then tried to integrate it into my existing setup where there is a file server. The Mac also had to be able to function outside the network so I could not simply use static NFS mounts, and this lead me into a situation I think noone else have described. Thus this document.
Ideally, the user and group names should be the same on both server and client. It is not a requirement but can reduce confusion later on.
Mac OS X automatically invents the underlying unix usernames for the accounts you create on the Mac. So when you create an account make sure you specify the same name as on the server. I know of no safe way to change username after creation (probably possible with niutil and a few directory renames, but it isn't something I would do)
OS X also automatically creates a group with the same name as the user and sets this as the primary group for the user. This is the same as most modern Linux systems do too (read manual for Linux' useradd tool) So when you create and account 'floffy' you get unix user named 'floffy' and a group 'floffy', and the command:
id
would output something like:
uid=501(floffy) gid=501(floffy) groups=501(floffy), 80(admin)
This document assumes that you do not need any exotic group configuration. If you do, then you have to investigate how to use the command-line tool niutil
Much of this section was inspired by How to change user ID document.
For NFS to work the numeric ID of the users and groups must be the same. In my case my Linux box assigned the first user the numeric id 500, while the Mac used 501. So I had to fix that.
First find out what the currently assigned user id of the user is. Log in as root (sudo sh) on the client and then:
niutil -read . /users/floffy | grep '^uid'
uid: 501
Discover group id (gid) on local machine
niutil -read . /users/floffy | grep '^gid'
gid: 501
niutil -read . /groups/floffy | grep '^gid'
gid: 501
I assume that all the above three commands would be equivalent with using the id command, but I am not 100% sure if it always integrates with NetInfo. Anyway, you have to use niutil to change the IDs so you can just as well get familiar with it now.
Log into the server and issue:
id floffy
which will output something similar to:
uid=500(floffy) gid=500(floffy) groups=500(floffy)
As you can see the user and group IDs on the client and the server are not the same.
Log in as an administrator on the client but not as the user you are going to change. If you do not have such an account you have to create a temporary account for it (Setup ➔ Accounts, make sure you enable "allow to manage computer" for the temporary user)
First: make sure that no processes belonging to the user is running:
ps -U floffy
If there is, then make sure the user is logged out, then kill the processes
Change the user ID with:
niutil -createprop . /users/floffy uid 500
Then verify with:
niutil -read . /users/floffy | grep '^uid'
Change the id of the group with:
niutil -createprop . /groups/floffy gid 500
Then verify with:
niutil -read . /groups/floffy | grep '^gid'
niutil -createprop . /users/floffy gid 500
Then verify with:
niutil -read . /users/floffy | grep '^gid'
After the user and group IDs have been changed you have to fix the existing files.
find /Users/floffy -user 501 -exec chown 500 {} \;
find /Users/floffy -group 501 -exec chgrp 500 {} \;
find /Library -user 501 -exec chown 500 {} \;
find /Applications -user 501 -exec chown 500 {} \;
find /usr -user 501 -exec chown 500 {} \;
Log out, and then log in as the changed user to verify that everything works locally (start a few applications, open a few files and save them)
After having verified that the user works you can remove the temporary user if you created one.
The server have to export the share to the client. Alternatively you may have set up that the entire network is trusted although such setups are becoming rare.
Log in on the server as root and modify the /etc/exports file. The share line must list the Mac client and which options apply. The current contents are probably something like:
/home otherclient1(rw,async) otherclient2(rw,async,no_root_squash)Append the Mac client with options to it:
/home otherclient1(rw,async) otherclient2(rw,async,no_root_squash) macmini(rw,async)
After having modified the file you must tell the NFS server proces(ses) to reload refresh the configuration:
exportfs -a
(I did try a lot of things before discovering that it is much easier to use the nice GUI)
Much of this section was inspired by Automounting Sharepoints at Startup.
On the client go into the NetInfo Manager (Finder ➔ Applications ➔ Utilities ➔ Netinfo Manager)
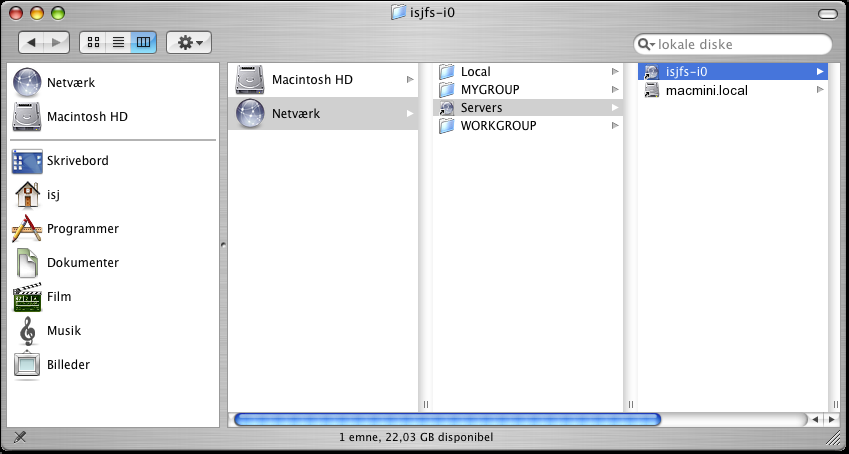
This is what the result will look like when finished:

Reboot. According to some information floating on the internet the automount daemons should re-read their configuration if given a SIGHUP signal, but mine died. So it is better to simply reboot.
Note 1: -i option: This option enables programs to be killed if the NFS server crashes. According to official NFS gurus the world will end (or even worse) if you configure an NFS client to not hang in such cases. I do not care. If the server has crashed I want to decide whether I can live with the potential data loss or not, thankyouverymuch. An alternative is the -s option which times out requests - that way you don't have to kill Finder if you accidentally click on the sharepoint when the server is unavailable.
Note 2: -P option: This option directs the NFS client to use a privileged port for communicating with the NFS server. Most NFS servers requires this. Alternatively you may be able to specify insecure as an option in the /etc/exports file on the server. You you can just play nice here. You must use the -P option if you see something like this in the server log:
Mar 27 01:29:59 isjfs rpc.mountd: authenticated mount request from macmini:1019 for /home (/home)
Mar 27 01:29:59 isjfs kernel: nfsd: request from insecure port (0a000008:49167)!
Apparently you can also use the option resvport, at least according to Using automount on Mac OS X on OS X 10.2, but that may involve using NetInfo mountmaps.
After these few steps it should work.
ls -l /Network/Servers/
should output something similar to:
total 2
lrwsr-xr-t  1 root  wheel  512 28 Mar 00:54 isjfs-i0 -> /private/Network/Servers/isjfs-i0
lrwxr-xr-x  1 root  wheel  512 28 Mar 00:54 macmini.local -> /
And
macmini:~ floffy$ ls -l /Network/Servers/isjfs-i0/home/
should output something similar to:
total 200
drwxr-xr-x   3 root  wheel   4096  8 May  2004 backups
drwxr-xr-x   7 root  wheel   4096 11 Apr  2004 hdr
drwxr-xr-x   3 root  wheel   4096  1 Jan  2003 html
drwxr-xr-x  27 isj   isj     4096 28 Mar 02:42 isj
drwx------   2 root  wheel  16384 18 Dec  2002 lost+found
drwxr-xr-x  51 root  wheel   4096 14 Mar 22:53 opt
drwxr-xr-x   3 root  wheel   4096 26 May  2004 opt_isjfs
drwxr-xr-x   2 root  wheel   4096 11 Sep  2004 opt_isjfs_64
drwx------   4 504   504     4096 27 Mar  2004 oracle
drwxr-xr-x  24 root  wheel   4096 24 Feb 22:37 root
In Finder it should look something like this: